


In the ever-evolving world of streaming services, picture quality can make all the difference in your viewing experience. Amazon Prime Video, a major player in this arena, offers a plethora of settings that can be optimized to enhance the visual clarity and richness of your favorite shows and movies. Whether you’re a casual viewer or a cinephile seeking the ultimate in picture perfection, understanding how to fine-tune these settings can significantly elevate your entertainment experience. This article will guide you through the best settings to enhance picture quality on Amazon Prime Video, ensuring that every frame you watch is as vibrant and detailed as the creators intended.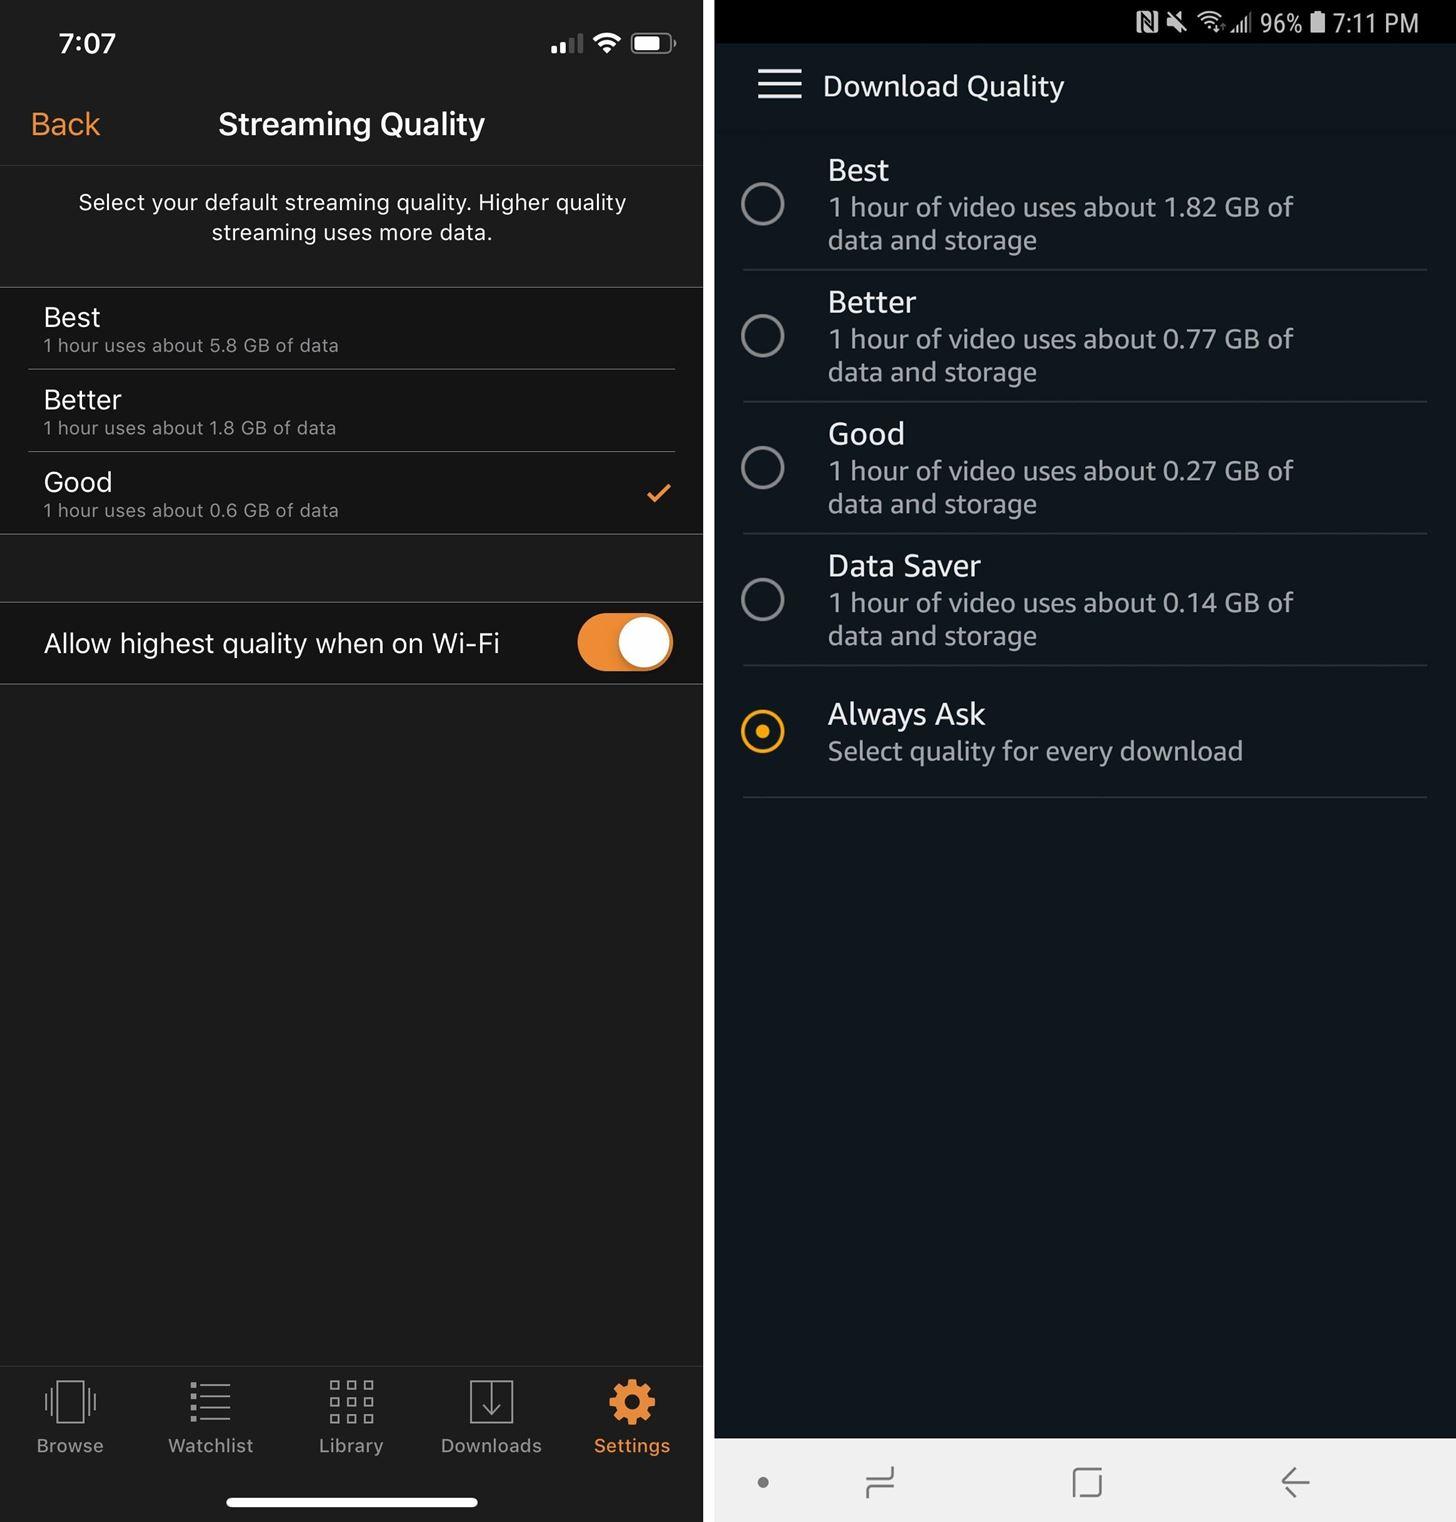
Optimizing Streaming Device Settings for Prime Video
To achieve the best picture quality while watching Amazon Prime Video, it’s crucial to fine-tune your streaming device settings. Start by ensuring your device is set to output at the highest resolution possible, ideally 4K if your TV supports it. This setting can usually be found under the video or display settings on your device. Adjust the HDR settings to HDR10 or Dolby Vision, if available, to experience richer colors and deeper contrast.
In addition to resolution, check your device’s network settings. Ensure that your internet connection is stable and capable of streaming high-definition content. A wired connection is often more reliable than Wi-Fi. If you must use Wi-Fi, make sure your device is close to the router and that there are minimal obstructions. Also, consider enabling adaptive streaming if your device supports it, as this can help maintain a consistent viewing experience by automatically adjusting the quality based on your network speed.
- Set resolution to the highest available (preferably 4K).
- Enable HDR settings for enhanced color and contrast.
- Use a wired internet connection for stability.
- Position your device close to the router if using Wi-Fi.
- Enable adaptive streaming to accommodate network fluctuations.
Adjusting Picture Quality Settings on Amazon Prime Video
Enhancing your viewing experience on Amazon Prime Video involves a few simple adjustments to the picture quality settings. First, ensure that your device is connected to a stable and fast internet connection, as this is crucial for streaming high-quality content. Once you’re set, navigate to the Prime Video app or website and look for the Settings or Playback options. Here, you’ll find various controls to customize your viewing experience.
- Data Saver: Opt for this setting if you’re on a limited data plan, as it reduces the quality to save bandwidth.
- Good: Offers a balanced quality, suitable for standard viewing without consuming excessive data.
- Better: Ideal for those who want improved quality while still managing data usage effectively.
- Best: Select this for the highest quality, which is perfect for high-definition displays and when data usage is not a concern.
By adjusting these settings, you can optimize the streaming quality according to your preferences and network conditions. Remember, the Best setting requires a strong internet connection to avoid buffering interruptions.
Enhancing HDR and 4K Content Viewing Experience
To truly appreciate the stunning visuals of HDR and 4K content on Amazon Prime Video, it’s essential to optimize your settings for a more immersive experience. Begin by ensuring that your display supports both HDR and 4K resolutions, and that it’s correctly configured to handle these formats. On your TV or monitor, navigate to the settings menu and look for options such as Dynamic Range, Color Space, and Resolution. Adjust these to their optimal levels—usually HDR10 or Dolby Vision for dynamic range, and Rec. 2020 for color space, while ensuring the resolution is set to 3840 x 2160 for true 4K quality.
Once your display settings are fine-tuned, don’t forget to check your Amazon Prime Video app settings. Make sure to enable Best Quality streaming under the app’s video settings to allow for automatic adjustment to the highest possible resolution based on your internet speed. Additionally, consider enabling Auto Adjust Video Quality to maintain a seamless viewing experience during network fluctuations. By following these steps, you can enhance your viewing experience, bringing out the vivid colors and sharp details that HDR and 4K content are known for.

Fine-Tuning Subtitles and Audio for Better Clarity
For those seeking to improve their viewing experience on Amazon Prime Video, adjusting subtitles and audio settings can significantly enhance clarity. Start by exploring the subtitle settings. You can modify the font size, color, and background to make the text more readable. Consider using a larger font size with a contrasting background to ensure the subtitles are easy to read, especially in brightly lit scenes.
- Adjust the font size to medium or large for better readability.
- Choose a background color that contrasts with the font color.
- Experiment with different subtitle styles to find the most comfortable option.
Next, focus on the audio settings. If the dialogue is difficult to hear over background sounds, consider enabling any available audio enhancement features. Some devices offer options like dynamic range compression, which can help balance the volume between dialogue and effects. Additionally, if the content supports it, switch to a different audio track, such as stereo or surround sound, to find the clearest option for your setup.
- Enable audio enhancements if available.
- Switch to stereo or surround sound for better clarity.
- Adjust your device’s equalizer settings to emphasize dialogue.


